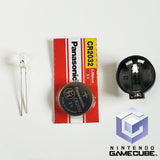
PCB Battery Holder & CR2032 Battery Clock Fix for Nintendo GameCube Controller Board
Product Details:
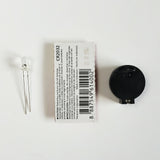
- This is a kit for your Game Cube's controller PBC board. It contains an LED, a battery holder, and a CR2032 battery.
- If GameCube prompts to reset the time, the CR2032 battery is dead. These consoles are about 20 years old, so chances are the battery is not working.
- This includes an LED with the color of your choice!
- This does not include the actual PCB board, this is only for the kit.
Battery:
- This will contain a brand new CR2032 battery, and a replacement battery holder. The original battery is soldered in, so this will make replacing the battery in the future much easier.
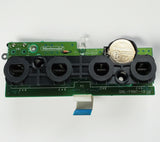
- The battery has a positive terminal and a negative one, desolder the original battery, and solder in the new battery holder. Take precaution, as the legs are thin to fit the holes of the PCB board and they bend easy.
- The orientation matters! You can see which leg goes where, as there is a plus and minus sign on the PCB board. Check out the photo in the ad to see the positioning.
- Hint! Very slightly bend one of the legs inward on the holder, these will not go straight in.
LED:
- I have the following colors in stock: Red/Orange/Yellow/Green/Blue/White/Pink/Purple(UV)/Chartreuse/Warm-white. (please message me your choice or write it in a message during checkout)
- These are 5mm and look fantastic in the GameCube. The original LED size is 3mm, so these are brighter. I did notice that the UV one is somewhat dim.
- The orientation matters. The longer leg is called the anode, the shorter leg is the cathode.
- Please look at the photo in the ad to check out the orientation.
- You have to bend the legs of the LED. Put the LED completely in the hole, then bend the legs. Secure it with kapton tape, then solder the LED into place.
- A blue LED will be included by default if you do not state a color in the checkout notes or message me afterwards.
Misc Notes:
- What happens if you mess up?? Let's say you rip a pad clean off: look on the underside of the PCB board, everything traces to another point. So lets say you messed up on the LED? You can solder in a small wire that goes from one leg of the LED where you messed up, tracing it to the next point. Please be very careful with this, as you can destroy your GameCube if you wire points incorrectly! I have done this successfully with the LED and battery. You can also use a scraping technique around the pad to uncover copper to solder onto that.
- I find the solder on these boards not too bad to remove. Although always apply new solder to the points before doing a desolder. Use a solder sucker in conjunction with copper braid if need be. Put a small bit of flux on the tip of the braid, it will make the desoldering process way easier. If you have one of those expensive Hakko desoldering tools, then you probably are a golden god of soldering and don't need to be reading any of this. You can also use a more advanced technique and heat up the solder and push out the LED and battery. Be warned you can rip pads clean off if you have no experience doing this technique!!
- This is to be considered a novice job. If you have moderate soldering experience, this shouldn't be too bad; the LED portion is harder than the battery portion. If you have no soldering experience, please do not attempt this job.
More Misc Notes:
- This will require a 4.5mm Gamebit security screwdriver bit to open up your GameCube. If you purchase multiple quantities, one will be included as a free gift.
- When you put back the top of the case, YOU MUST keep the disc tray open or else you WILL destroy the legs of the eject mechanism that is attached to the DVD drive. This is why that board is so expensive, it is not repairable if those legs are destroyed, and the only reason why those legs break is because the person did not keep the tray open when putting back the top of the case!
- Be very careful when removing the ribbon cable on the PCB board, ESPECIALLY when putting it back into the GameCube motherboard. There are these silver pins on the ribbon that you can destroy if you insert this ribbon incorrectly! When inserting it back in, notice a small crease on the end of the ribbon, bend that to a 90 degree angle, then put your finger on top of the bend, position the ribbon, and press down gently. This is really about technique, so take your time.
- When putting back the 4.5mm screws DO NOT re-thread the screws! What this means is that if the screw does not easily go in, you must remove it and try again. You can snap the legs inside the GameCube case if you rethread the screws. Hint! Go counterclockwise when screwing in screws until you feel a slight CLICK. Once you feel that click, screw clockwise, the screw should be in position.


